Quantcast
Channel: Eltima Software – Knowledge Base
Viewing all 959 articles
Browse latest View live

Activation

$
0
0

How to activate demo version of PhotoBulk:
Once you have purchased PhotoBulk, activate it to benefit from all its advantages. To activate PhotoBulk, take these steps:

Note: Access to the Internet is required.

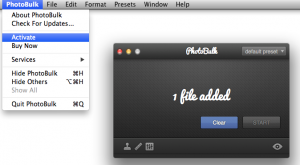
1. Click “Activate” in PhotoBulk menu:

Click “Activate” in PhotoBulk menu.

2. In the invoked window enter your activation code you’ve received from us:

Enter your activation code.

3. Finally, click “OK” button.

4. PhotoBulk will be activated automatically. No system reboot or application restart is required.

Check PhotoBulk About window

5. If you still don’t have licensed version of PhotoBulk, you can upgrade your Free edition by clicking “Buy full version” button.

If you don’t have Internet access on your Mac…

In this case you can activate PhotoBulk manually (offline). You will need to use another Mac which is online to get the special activation file.

Do the following:

1. Repeat steps 1-3 of the instruction above.

2. You will get the following message:

Activate PhotoBulk manually (offline).

3. Click “Activate manually” button.

4. In the invoked window read the instructions and click “Save activation info” button:

Save activation info.

5. Save the activation info to the file (it will have .activate extension):

Save activation info.

6. Then bring this file (on a USB flash drive, for example) to any computer which has Internet access.

7. Go to https://activate.eltima.com. Click “Choose File” button to load the file, enter the verification code and click “Submit” button:

Submit activation info.

8. Activation file will be sent to the e-mail address (from which the order was placed). You will also have the possibility to download this file right away.

9. Bring this file to your Mac (where PhotoBulk is installed). Repeat steps 1-3 of this instruction to invoke the following window and click “Load activation file” button:

Load activation file.

10. Once activation is successfully completed, you will get a confirmation message.

Notes:

1. PhotoBulk may be occasionally reactivated in the background to ensure smooth and uninterrupted license compliance check. This will require Internet connection as well. If there is no access to the Internet available on your Mac, you can reactivate PhotoBulk manually (offline). Follow the instructions above.

2. No personal information is collected during activation. Check our Privacy Policy for details.

Still have questions concerning activation? Read the FAQs.


How to share a serial device over network

$
0
0

In order to share a serial device (real serial port) over network you’ll basically need to do the following:

  1. Install Serial to Ethernet Connector (SEC) on both PCs.
  2. In SEC on the server side (the machine where the device is physically connected) create a server connection, selecting a real serial port to share and a TCP port to listen to:

    http://wiki.eltima.com/user-guides/sec-pc/server.html

  3. In SEC on the client side create a client connection, specifying the server’s IP address and the TCP port number to connect to (the same as you specified on the server):

    http://wiki.eltima.com/user-guides/sec-pc/client.html

    If you’d like to create the client connection on a virtual serial port instead of a real one, please also check ‘Create as virtual port’ and ‘Strict baudrate emulation’ options in the connection settings.

  4. In Advanced connection settings on both sides select ‘Use Telnet (RFC 2217) protocol’ option:

    http://wiki.eltima.com/user-guides/sec-pc/server-advanced.html

Once the connection is established, all data sent from the serial device attached to the server will be redirected to the specified serial port on the client, and the other way around.

Does Folx support Google Chrome?

$
0
0

At the moment Folx doesn’t support Google Chrome. Our Development team has been already notified about this issue, but we can’t promise that the fix will be implemented in the nearest release of Folx.
Currently Folx is fully compatible with Safari, Firefox and Opera browsers.
We would recommend you to subscribe to our RSS feed to be first to know about Folx fixes and updates: http://mac.eltima.com/rss/en-downloader.rss

How many virtual serial ports / connections will I be able to create having purchased a license?

$
0
0

There is no limitation on the quantity of virtual serial ports or connections that can be created. The licensing is based on the number of systems.

The basic license option is called Two-License Pack. It allows performing two installations of the product: on Windows and/or Linux, depending on the platform selected during order placement.

I am confused of when the PC should be functioning as SEC server / SEC client, and when SEC is not needed on the other end

$
0
0
  1. In fact, the server and client connection types are completely interchangeable – the serial port/device can be shared using either type of connection. So, having multiple clients connected to one server is essentially the same as having multiple servers connected to one client. However, following the conventional client-server logic, it’s usually more convenient to use server connections for sharing the ports, client – for establishing remote connections.
  2. SEC is based on client-server architecture and the usage of this product generally implies installing it on both sides. However, if the application on the remote computer is capable of initializing outgoing TCP/UDP connections, you can do without SEC there.

Does Folx support Google Chrome?

$
0
0

At the moment Folx doesn’t support Google Chrome. Our Development team has been already notified about this issue, but we can’t promise that the fix will be implemented in the nearest release of Folx.

Currently Folx is fully compatible with Safari, Firefox and Opera browsers.

We would recommend you to subscribe to our RSS feed to be the first to know about Folx fixes and updates: http://mac.eltima.com/rss/en-downloader.rss

Manage Presets

$
0
0

Note: Presets are available in a licensed version only. Activate PhotoBulk to benefit from all its features.

1. Create and save presets

First choose a watermark, set resize and optimization options.
Then click Save As in PhotoBulk menu –> Presets:

Create and save a preset

Choose preset name:

Save a preset

Now you can see your saved preset in the list of available presets.
The next time you decide to process images, all you have to do will be to choose the right preset from the drop-down list:

Choose a preset from the list

2. Save changes

To save changes you’ve just made to a preset, click Save in PhotoBulk menu –> Presets.
Make sure the right preset is chosen from the drop-down list.

Save changes

3. Save settings as a preset

To save settings you’ve just applied, click Save As button once the images are processed:

Save settings

The next time you decide to process images, you will be able to choose this saved preset from the drop-down list.

Choose preset

4. Rename preset

You can rename your presets any time.

Click Rename in PhotoBulk menu –> Presets.
Make sure the right preset is chosen from the drop-down list.

Rename preset

5. Delete preset

To delete a preset, click Delete in PhotoBulk menu –> Presets.
Make sure the right preset is chosen from the drop-down list.

Delete preset

Which of the computers is considered the server / the client? Should both be registered?

$
0
0
  1. In terms of USB Network Gate the server is the computer that has the shared USB device(s) connected physically, the client is the one that connects to the shared device(s) remotely.

    For convenience USB Network Gate server and client parts are combined in one application. The USB devices are shared through “Share local USB devices” tab (server), while “Remote USB devices” tab is used to connect to the shared USB devices remotely (client).

  2. It is important to remember that only USB Network Gate servers require registration; the client installations are free and need not be registered.

    The client tab in USB Network Gate will work regardless of whether the product is registered. The registration is required in order to have access to the server tab.


The shared USB devices fail to be found in “Add remote USB devices” dialog on the client

$
0
0
  1. Please make sure that:
  2. Unless the server and the client are in the same local network, you should search for the shared devices by the server’s external IP address, rather than by its network name.
  3. If the server is behind network address translation (NAT), you will also need to configure the forwarding of required network ports (see above). For further details please contact your ISP or network administrator.

User Guides

$
0
0

License

SyncMate Team blog

Purchase

Support Operator Agreement. General Statements.

$
0
0
  1. An active Support Operator Agreement entitles Support Operator to install and use USB Network Gate to remotely support his clients during the coverage period.
  2. Under this Agreement, USB Network Gate can be installed on Support Operator’s system (-s), as well as on his clients’ system (-s), for remote testing, debugging, troubleshooting, etc. of USB devices shared on his clients’ system (-s).
  3. The number of allowed installations, as well as the number of USB devices to be shared simultaneously, may vary and should be discussed separately with Eltima Sales Dpt.
  4. Registration is required for USB Network Gate server module only, used for USB devices sharing on the clients’ systems. USB Network Gate client module, installed on Support Operator’s system (-s), does not require registration. After the license purchase,
  5. Support Operator gets registration key (-s) according to the number of clients who need to install USB Network Gate on their systems for USB devices sharing.
  6. The coverage period may vary depending on Support Operator’s needs and may constitute 30, 60 or 120 days.
  7. Support Operator License model for USB Network Gate depends on the coverage period, the number of clients and the number of
  8. USB devices to be shared simultaneously. Contact Eltima Sales Dpt. (sales@eltima.com) to calculate the licensing model and to get the official Quote.
  9. To renew Support Operator Agreement, contact Eltima Sales Dpt. (sales@eltima.com).
    Each instance of USB Network Gate, covered by active Support Operator Agreement, is entitled to get free email support from
  10. Eltima Customer Service during the specified coverage period. Support is provided via email (support@eltima.com) in English during Central European Time business hours: Monday through Friday, 8:00 a.m. to 5:00 p.m., excluding holidays. Response time by email is 16 hours.

test

$
0
0

<proto version=”6.0″>
<operation type=”command_name” />
…………………
…………………
</operation>
</proto>


Article 0

The rest of our products

$
0
0

Registration & Activation questions

$
0
0

Sales FAQ

$
0
0

How to Start

$
0
0

1. Drag and drop files to PhotoBulk – one by one or in a batch.
Drag and drop files to PhotoBulk
2. Use PhotoBulk tools to apply watermark, resize and optimize your images:

Apply watermark, resize and optimize your images
Read in detail here:

  • Watermark
  • Resize
  • Optimize
  • Rename
  • Convert

3. Preview images before applying any changes:

Preview changes

4. Click “Start”.

Start

5. Choose the path to save your images:

Save your images
Set conversion settings, if needed. Read in detail here:

6. Once files are successfully saved, you can browse to them in Finder:
Browse to files in Finder

7. You can now save changes to current preset to be able to apply it in future:

Save changes to current preset

Read more about work with presets here: http://wiki.eltima.com/user-guides/photo-bulk/manage-presets.html

Viewing all 959 articles
Browse latest View live