Connect to an FTP Server
This feature is available in PRO Pack mode only!
Follow these steps to use the built-in FTP client:
1. Click the “FTP connections” toolbar button.
![]()
2. In Name field type the connection name.
Set the protocol type – FTP, FTPS or SFTP.
FTP stands for File Transfer Protocol. This is one of the most common ways to upload and download files from the server.
FTPS is FTP with SSL (Secure Sockets Layer) for security. It uses a control channel and opens new connections for the data transfer.
SFTP stands for Secure File Transfer Protocol and is the encrypted version of FTP. Users are advised to use the SFTP protocol to ensure that the file transmission is secure.
3. Type the server address.
4. Set the port number. By default, it is set to 21.
5. Enter your login and password. If you do not have an account on the server, check Anonymous login.
6. Choose the connection mode – Active or Passive.
Active and passive modes are the two modes that FTP can run in. FTP uses two channels between client and server: command and data, which are actually separate TCP connections.
The command channel is for commands and responses. The data channel is for actually transferring files.
In active mode, the client establishes the command channel, while the server establishes the data channel.
In passive mode, the client establishes both channels. In this case, the server tells the client which port should be used for the data channel.
Passive mode is generally used when the FTP server is not able to establish the data channel. One of the major reasons for this is network firewalls. Passive mode solves this by opening up both types of channel from the client side.
Active mode is set by default.
7. Set the remote path – This is the folder on the web server the file is uploaded to. Leaving the remote path filed blank means the file will be uploaded to the default folder your FTP account logs into.
8. Click Connect.
Now you can work on the server like on a local hard disk – you can upload and download files, delete them, edit, etc.
![]()
To terminate the connection, click Disconnect:
![]()
Or click Eject:
![]()
If you host your FTP servers with Atlantic.Net check the following instruction.
Dropbox
You can connect one or even several Dropbox accounts to Commander One and work with files in the account(s) directly from the app’s interface.
External Dropbox mounter is available in PRO Pack mode only!
![]()
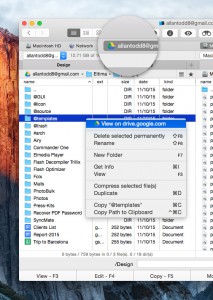
Additionally, you will be able to use the Share and other Dropbox options when working with the Dropbox files through Commander One’s interface (via the right-click menu):
![]()
Notes:
1. The context menu integration is available only if Dropbox.app is installed on your Mac.
2. In case Selective Sync is enabled (go to Dropbox Preferences from your desktop –> the Account tab), unchecked folders (folders that you don’t want to sync to your computer’s hard drive) won’t be shown in Commander One’s interface as well. However, if you open the Dropbox account as a disk, you will be able to see and work with the unchecked folders.
![]()
You can also use the Share and other Dropbox options when mounting Dropbox as a disk:
![]()
Note: You should be logged into your Dropbox account in your browser.
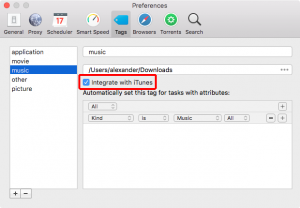
To connect your Dropbox account, go to Preferences (the Integration tab) and link the account.
![]()
The default browser on your Mac will launch. Now follow the steps of the wizard.
In case you connected several Dropbox accounts, make sure you’ve chosen the required one in the drop-down menu in Preferences, before starting working with files in the account through Commander One interface.
![]()
![]()
Google Drive
You can connect your Google Drive account to Commander One and work with files in the account directly from the app’s interface.
Google Drive mounter is available in PRO Pack mode only!
![]()
To connect your Google Drive account, go to Preferences (the Integration tab) and link the account.
The default browser on your Mac will launch. Now follow the steps of the wizard.
![]()
![]()
Amazon S3
Commander One allows accessing and managing data stored on Amazon S3. Amazon S3 is a cloud storage for the Internet.
![]()
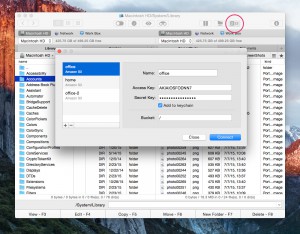
Follow these steps to connect to Amazon S3:
1. Click the Amazon S3 toolbar button.
2. In Name field type the connection name.
3. Enter the Access key. This is actually a username.
4. Enter the Secret key. This key plays the role of a password.
5. Enter the bucket name. The region where your bucket resides is detected automatically.
6. Click Connect.
OneDrive
WebDAV